KTHW - End result
July 12, 2020 - Reading time: ~1 minute
2x Controller
- etcd
- kube-apiserver
- nginx (/healtz)
- kube-controller-manager
- kube-scheduler
1x Remote Kubectl (client)
1x Kube API load balancer (nginx)
2x Worker
- containerd (instead of docker)
- kubelet
- kube-proxy
KTHW - Set-up the client
July 12, 2020 - Reading time: ~1 minute
CFSSL - CloudFare's open source toolkit for everything TLS/SSL.
cloud_user@pzolo6c:~/cfssl$ curl https://github.com/cloudflare/cfssl/releases/download/v1.4.1/cfssl_1.4.1_linux_amd64 -LO
cloud_user@pzolo6c:~/cfssl$ curl https://github.com/cloudflare/cfssl/releases/download/v1.4.1/cfssljson_1.4.1_linux_amd64 -LO
cloud_user@pzolo6c:~/cfssl$ chmod 777 cfssl*
cloud_user@pzolo6c:~/cfssl$ sudo mv cfssl_1.4.1_linux_amd64 /usr/local/bin/cfssl
cloud_user@pzolo6c:~/cfssl$ sudo mv cfssljson_1.4.1_linux_amd64 /usr/local/bin/cfssljson
cloud_user@pzolo6c:~/cfssl$ cfssl version
Version: 1.4.1
Runtime: go1.12.12
Kubectl - The Kubernetes command-line tool, kubectl, allows you to run commands against Kubernetes clusters
curl -LO https://storage.googleapis.com/kubernetes-release/release/`curl -s https://storage.googleapis.com/kubernetes-release/release/stable.txt`/bin/linux/amd64/kubectl
cloud_user@pzolo6c:~$ chmod 770 kubectl
cloud_user@pzolo6c:~$ sudo mv kubectl /usr/local/bin/
cloud_user@pzolo6c:~$ kubectl version --client| egrep -o "\{.*"
{Major:"1", Minor:"18", GitVersion:"v1.18.5", GitCommit:"e6503f8d8f769ace2f338794c914a96fc335df0f", GitTreeState:"clean", BuildDate:"2020-06-26T03:47:41Z", GoVersion:"go1.13.9", Compiler:"gc", Platform:"linux/amd64"}
KTHW - Set-up the CA and certificates
July 12, 2020 - Reading time: 5 minutes
-
Client certificates Used for authentication from any kube-* service to the Kube API LB.
-
Kube API Server Certificate Signed certificate for the API LB
-
Service Account Key Pair Certificate used to sign service account tokens.
Generate the CA
## Details of CA that I want to create
cloud_user@pzolo6c:~/kthw$ cat ca-csr.json | jq .
{
  "CN": "Kubernetes",
  "key": {
    "algo": "rsa",
    "size": 2048
  },
  "names": [
    {
      "C": "US",
      "L": "Portland",
      "O": "Kubernetes",
      "OU": "CA",
      "ST": "Oregon"
    }
  ]
}
## Certificate details
cloud_user@pzolo6c:~/kthw$ cat ca-config.json | jq .
{
  "signing": {
    "default": {
      "expiry": "8760h"
    },
    "profiles": {
      "kubernetes": {
        "usages": [
          "signing",
          "key encipherment",
          "server auth",
          "client auth"
        ],
        "expiry": "8760h"
      }
    }
  }
}
## Generate a JSON with CSR, cert and key and then write to a file
cloud_user@pzolo6c:~/kthw$ cfssl gencert -initca ca-csr.json | cfssljson -bare ca
2020/07/12 20:30:32 [INFO] generating a new CA key and certificate from CSR
2020/07/12 20:30:32 [INFO] generate received request
2020/07/12 20:30:32 [INFO] received CSR
2020/07/12 20:30:32 [INFO] generating key: rsa-2048
2020/07/12 20:30:32 [INFO] encoded CSR
2020/07/12 20:30:32 [INFO] signed certificate with serial number 113170212320509007336156775422336010737695630373
cloud_user@pzolo6c:~/kthw$ openssl x509 -in ca.pem -text -noout | grep -e Issuer -e Subject -e Before -e After -e Sign -e TRUE
    Signature Algorithm: sha256WithRSAEncryption
        Issuer: C = US, ST = Oregon, L = Portland, O = Kubernetes, OU = CA, CN = Kubernetes
            Not Before: Jul 12 20:26:00 2020 GMT
            Not After : Jul 11 20:26:00 2025 GMT
        Subject: C = US, ST = Oregon, L = Portland, O = Kubernetes, OU = CA, CN = Kubernetes
        Subject Public Key Info:
                Certificate Sign, CRL Sign
                CA:TRUE
            X509v3 Subject Key Identifier:
    Signature Algorithm: sha256WithRSAEncryption
Generate Client certs
The certificates will be created using a csr.json file for the client, and specifying the newqly created ca.pem and ca-key.pem
# Admin client
cloud_user@pzolo6c:~/kthw$ jq .CN admin-csr.json
"admin"
cloud_user@pzolo6c:~/kthw$ cfssl gencert -ca=ca.pem -ca-key=ca-key.pem -config=ca-config.json -profile=kubernetes admin-csr.json | cfssljson -bare admin
# Workers client
cloud_user@pzolo6c:~/kthw$ WORKER0_IP=172.31.22.212
cloud_user@pzolo6c:~/kthw$ WORKER1_IP=172.31.27.176
cloud_user@pzolo6c:~/kthw$ jq .CN pzolo*.mylabserver.com-csr.json
"system:node:pzolo4c.mylabserver.com"
"system:node:pzolo5c.mylabserver.com"
cloud_user@pzolo6c:~/kthw$ cfssl gencert -ca=ca.pem -ca-key=ca-key.pem -config=ca-config.json -hostname=${WORKER0_IP},${WORKER0_HOST} -profile=kubernetes ${WORKER0_HOST}-csr.json | cfssljson -bare ${WORKER0_HOST}
cloud_user@pzolo6c:~/kthw$ cfssl gencert -ca=ca.pem -ca-key=ca-key.pem -config=ca-config.json -hostname=${WORKER1_IP},${WORKER1_HOST} -profile=kubernetes ${WORKER1_HOST}-csr.json | cfssljson -bare ${WORKER1_HOST}
# Controller Manager Client Certificate
cloud_user@pzolo6c:~/kthw$ jq .CN kube-controller-manager-csr.json
"system:kube-controller-manager"
cloud_user@pzolo6c:~/kthw$ cfssl gencert -ca=ca.pem -ca-key=ca-key.pem -config=ca-config.json -profile=kubernetes kube-controller-manager-csr.json | cfssljson -bare kube-controller-manager
# Kube Proxy Client Certificate
cloud_user@pzolo6c:~/kthw$ jq .CN kube-proxy-csr.json
"system:kube-proxy"
cloud_user@pzolo6c:~/kthw$ cfssl gencert -ca=ca.pem -ca-key=ca-key.pem -config=ca-config.json -profile=kubernetes kube-proxy-csr.json | cfssljson -bare kube-proxy
# Kube Scheduler Client Certificate
cloud_user@pzolo6c:~/kthw$ jq .CN kube-scheduler-csr.json
"system:kube-scheduler"
cfssl gencert -ca=ca.pem -ca-key=ca-key.pem -config=ca-config.json -profile=kubernetes kube-scheduler-csr.json | cfssljson -bare kube-scheduler
# Service account certificates
cloud_user@pzolo6c:~/kthw$ jq .CN service-account-csr.json
"service-accounts"
cloud_user@pzolo6c:~/kthw$ cfssl gencert -ca=ca.pem -ca-key=ca-key.pem -config=ca-config.json -profile=kubernetes service-account-csr.json | cfssljson -bare service-account
Generate the API LB server cert
This certificate has a long list of hostname, because it's the entry point for all clients.
# 10.32.0.1 is a kubernetes IP that some service clients may use. The rest are IP and hostnames for the controllers and the API LB
cloud_user@pzolo6c:~/kthw$ CERT_HOSTNAME=10.32.0.1,127.0.0.1,localhost,kubernetes.default,172.31.22.121,172.31.29.101,172.31.29.90,pzolo1c.mylabserver.com,pzolo2c.mylabserver.com,pzolo3c.mylabserver.com
# Kube Proxy API LB Server certificate
cloud_user@pzolo6c:~/kthw$ jq .CN kubernetes-csr.json
"kubernetes"
cloud_user@pzolo6c:~/kthw$ cfssl gencert -ca=ca.pem -ca-key=ca-key.pem -config=ca-config.json -hostname=${CERT_HOSTNAME} -profile=kubernetes kubernetes-csr.json | cfssljson -bare kubernetes
Distribute the certs
cloud_user@pzolo6c:~/kthw$ scp ca.pem pzolo4c.mylabserver.com-key.pem pzolo4c.mylabserver.com.pem wrk01:~/
cloud_user@pzolo6c:~/kthw$ scp ca.pem pzolo5c.mylabserver.com-key.pem pzolo5c.mylabserver.com.pem wrk02:~/
cloud_user@pzolo6c:~/kthw$ scp ca.pem ca-key.pem kubernetes-key.pem kubernetes.pem service-account-key.pem service-account.pem ctl01:~/
cloud_user@pzolo6c:~/kthw$ scp ca.pem ca-key.pem kubernetes-key.pem kubernetes.pem service-account-key.pem service-account.pem ctl02:~/
KTHW - Kubeconfigs
July 12, 2020 - Reading time: 3 minutes
It's a file that stores information about clusters, users, namespaces and auth mechanisms. All the data required to connect and interact with a kubernetes cluster.
# Admin kubeconfig #
# Connects to the controller on localhost
# The embed certs option allows us to move the config file to other machines
# First step, define the cluster settings
cloud_user@pzolo6c:~/kthw$ kubectl config set-cluster kubernetes-the-hard-way --certificate-authority=ca.pem --embed-certs=true --server=https://127.0.0.1:6443 --kubeconfig=admin.kubeconfig
cloud_user@pzolo6c:~/kthw$ cat admin.kubeconfig | cut -b -50
apiVersion: v1
clusters:
- cluster:
    certificate-authority-data: LS0tLS1CRUdJTiBDRV
    server: https://127.0.0.1:6443
  name: kubernetes-the-hard-way
contexts: null
current-context: ""
kind: Config
preferences: {}
users: null
# Second step, set credentials for the admin user
cloud_user@pzolo6c:~/kthw$ kubectl config set-credentials admin --client-certificate=admin.pem --client-key=admin-key.pem --embed-certs=true --kubeconfig=admin.kubeconfig
cloud_user@pzolo6c:~/kthw$ cat admin.kubeconfig | cut -b -50
apiVersion: v1
clusters:
- cluster:
    certificate-authority-data: LS0tLS1CRUdJTiBDRV
    server: https://127.0.0.1:6443
  name: kubernetes-the-hard-way
contexts: null
current-context: ""
kind: Config
preferences: {}
users:
- name: admin
  user:
    client-certificate-data: LS0tLS1CRUdJTiBDRVJUS
    client-key-data: LS0tLS1CRUdJTiBSU0EgUFJJVkFUR
# Third step create the default context
cloud_user@pzolo6c:~/kthw$ kubectl config set-context default --cluster=kubernetes-the-hard-way --user=admin --kubeconfig=admin.kubeconfig
cloud_user@pzolo6c:~/kthw$ cat admin.kubeconfig | cut -b -50
apiVersion: v1
clusters:
- cluster:
    certificate-authority-data: LS0tLS1CRUdJTiBDRV
    server: https://127.0.0.1:6443
  name: kubernetes-the-hard-way
contexts:
- context:
    cluster: kubernetes-the-hard-way
    user: admin
  name: default
current-context: ""
kind: Config
preferences: {}
users:
- name: admin
  user:
    client-certificate-data: LS0tLS1CRUdJTiBDRVJUS
    client-key-data: LS0tLS1CRUdJTiBSU0EgUFJJVkFUR
# Final step, specify that we want to use the default context
cloud_user@pzolo6c:~/kthw$ kubectl config use-context default --kubeconfig=admin.kubeconfig
cloud_user@pzolo6c:~/kthw$ cat admin.kubeconfig | cut -b -50
apiVersion: v1
clusters:
- cluster:
    certificate-authority-data: LS0tLS1CRUdJTiBDRV
    server: https://127.0.0.1:6443
  name: kubernetes-the-hard-way
contexts:
- context:
    cluster: kubernetes-the-hard-way
    user: admin
  name: default
current-context: default
kind: Config
preferences: {}
users:
- name: admin
  user:
    client-certificate-data: LS0tLS1CRUdJTiBDRVJUS
    client-key-data: LS0tLS1CRUdJTiBSU0EgUFJJVkFUR
We'll need to repeat the same steps for kube-scheduler , kube-controller-manager , kube-proxy and for each worker node (kublet). The worker nodes and the kube-proxy won't connect to localhost:6443, but to the private address of the proxy.
Then send the file over to the worker and controller nodes:
cloud_user@pzolo6c:~/kthw$ scp pzolo4c.mylabserver.com.kubeconfig kube-proxy.kubeconfig   wrk01:~/
cloud_user@pzolo6c:~/kthw$ scp pzolo5c.mylabserver.com.kubeconfig kube-proxy.kubeconfig   wrk02:~/
cloud_user@pzolo6c:~/kthw$ scp admin.kubeconfig kube-controller-manager.kubeconfig kube-scheduler.kubeconfig ctl01:~/
cloud_user@pzolo6c:~/kthw$ scp admin.kubeconfig kube-controller-manager.kubeconfig kube-scheduler.kubeconfig ctl02:~/
KTHW - Encrypting the configuration
July 13, 2020 - Reading time: 3 minutes
The etcd module allows us to store sensitive data in an encrypted format. We'll need to create an encryptioin-config.yaml file that will be use by the etcd client when storing settings. The file contains a randomly generated 32 bit secrey key used by AES-CBC
cloud_user@linuxacademy:~/kthw$ ENCRYPTION_KEY=$(head -c 32 /dev/urandom | base64)
cloud_user@linuxacademy:~/kthw$ cat encryption-config.yaml
kind: EncryptionConfig
apiVersion: v1
resources:
  - resources:
      - secrets
    providers:
      - aescbc:
          keys:
            - name: key1
              secret: hjwmr9dCeI1/S1yqBn8arDCyXkoC6r2qxES2AAy8CfE=
      - identity: {}
# Place the file on the controller nodes
cloud_user@linuxacademy:~/kthw$ scp encryption-config.yaml ctl01:~/
cloud_user@linuxacademy:~/kthw$ scp encryption-config.yaml ctl02:~/
etcd is a distributed key/value store that provides a reliable way to store data across a cluster. It only runs on the controller nodes, and it needs to be clustered. It uses https://raft.github.io/ as a consensus algorithm.
Set-up etcd
cloud_user@pzolo1c:~$ curl -LO https://github.com/etcd-io/etcd/releases/download/v3.4.9/etcd-v3.4.9-linux-amd64.tar.gz
cloud_user@pzolo1c:~$ tar -xzf etcd-v3.4.9-linux-amd64.tar.gz
cloud_user@pzolo1c:~$ sudo cp etcd-v3.4.9-linux-amd64/etcd* /usr/local/bin/
cloud_user@pzolo1c:~$ sudo mkdir -p /etc/etcd /var/lib/etcd
# Place the CA file and key/cert for controller on the etc folder
cloud_user@pzolo1c:~$ sudo cp ca.pem kubernetes-key.pem kubernetes.pem /etc/etcd/
# Create a new service for systemd
cloud_user@pzolo1c:~$ ETCD_NAME=$(hostname) ; INTERNAL_IP=172.31.22.121 ; INITIAL_CLUSTER=$ETCD_NAME=https://$INTERNAL_IP:2380,pzolo2c.mylabserver.com=https://172.31.29.101:2380
cloud_user@pzolo1c:~$ cat << EOF > etcd.service
> [Unit]
> Description=etcd
> Documentation=https://github.com/coreos
>
> [Service]
> ExecStart=/usr/local/bin/etcd \\
>   --name ${ETCD_NAME} \\
>   --cert-file=/etc/etcd/kubernetes.pem \\
>   --key-file=/etc/etcd/kubernetes-key.pem \\
>   --peer-cert-file=/etc/etcd/kubernetes.pem \\
>   --peer-key-file=/etc/etcd/kubernetes-key.pem \\
>   --trusted-ca-file=/etc/etcd/ca.pem \\
>   --peer-trusted-ca-file=/etc/etcd/ca.pem \\
>   --peer-client-cert-auth \\
>   --client-cert-auth \\
>   --initial-advertise-peer-urls https://${INTERNAL_IP}:2380 \\
>   --listen-peer-urls https://${INTERNAL_IP}:2380 \\
>   --listen-client-urls https://${INTERNAL_IP}:2379,https://127.0.0.1:2379 \\
>   --advertise-client-urls https://${INTERNAL_IP}:2379 \\
>   --initial-cluster-token etcd-cluster-0 \\
>   --initial-cluster ${INITIAL_CLUSTER} \\
Restart=on-failure
RestartSec=5

[Install]
WantedBy=multi-user.target
EOF>   --initial-cluster-state new \\
>   --data-dir=/var/lib/etcd
> Restart=on-failure
> RestartSec=5
>
> [Install]
> WantedBy=multi-user.target
> EOF
cloud_user@pzolo1c:~$ sudo  cp etcd.service /etc/systemd/system/
# Enable / start the service
cloud_user@pzolo1c:~$ sudo systemctl daemon-reload
cloud_user@pzolo1c:~$ sudo systemctl enable etcd
Created symlink /etc/systemd/system/multi-user.target.wants/etcd.service → /etc/systemd/system/etcd.service.
cloud_user@pzolo1c:~$ sudo systemctl start etcd
After starting the service on both controllers, we can verify that the cluster is active with:
cloud_user@pzolo2c:~$ sudo ETCDCTL_API=3 etcdctl member list   --endpoints=https://127.0.0.1:2379   --cacert=/etc/etcd/ca.pem   --cert=/etc/etcd/kubernetes.pem   --key=/etc/etcd/kubernetes-key.pem
c1b4898f05dfeb2, started, pzolo2c.mylabserver.com, https://172.31.29.101:2380, https://172.31.29.101:2379, false
f80fdba247d2636b, started, pzolo1c.mylabserver.com, https://172.31.22.121:2380, https://172.31.22.121:2379, false
KTHW - The kubernetes control plane
July 13, 2020 - Reading time: 8 minutes
Our controller nodes make global decisions about the cluster and reacts to cluster events. The main components of the server are:
- kube-apiserver: It's the interface to the controller
- etcd: Datastore.
- kube-scheduler: Finds a node where we can place a pod. (pods contain one or mode containers)
- kube-controller-manager: It's the manager of the rest of controllers.
- cloud-controller-manager: Handles interaction with underlying cloud providers.
Installing the binaries
cloud_user@pzolo2c:~$ for bin in kube-apiserver kube-controller-manager kubectl kube-scheduler ; do curl -LO "https://storage.googleapis.com/kubernetes-release/release/`curl -s https://storage.googleapis.com/kubernetes-release/release/stable.txt`/bin/linux/amd64/$bin" ; done
cloud_user@pzolo2c:~$ chmod 770 kub*
cloud_user@pzolo2c:~$ sudo cp kube-apiserver kube-controller-manager kubectl kube-scheduler  /usr/local/bin/
The kube-apiserver
Provides the primary interface for the Kubernetes control plane and the cluster as a whole
cloud_user@pzolo2c:~$ sudo /usr/local/bin/kube-apiserver --version
Kubernetes v1.18.5
cloud_user@pzolo2c:~$ sudo mkdir -p /var/lib/kubernetes/
cloud_user@pzolo2c:~$ sudo cp ca.pem ca-key.pem kubernetes-key.pem kubernetes.pem service-account-key.pem service-account.pem encryption-config.yaml /var/lib/kubernetes/
cloud_user@pzolo2c:~$ INTERNAL_IP=172.31.29.101 ; CONTROLLER1_IP=$INTERNAL_IP ; CONTROLLER0_IP=172.31.22.121
cloud_user@pzolo2c:~$ cat << EOF | sudo tee /etc/systemd/system/kube-apiserver.service
[Unit]
Description=Kubernetes API Server
Documentation=https://github.com/kubernetes/kubernetes

[Service]
ExecStart=/usr/local/bin/kube-apiserver \\
  --advertise-address=${INTERNAL_IP} \\
  --allow-privileged=true \\
  --apiserver-count=3 \\
  --audit-log-maxage=30 \\
  --audit-log-maxbackup=3 \\
  --audit-log-maxsize=100 \\
  --audit-log-path=/var/log/audit.log \\
  --authorization-mode=Node,RBAC \\
  --bind-address=0.0.0.0 \\
  --client-ca-file=/var/lib/kubernetes/ca.pem \\
  --enable-admission-plugins=NamespaceLifecycle,NodeRestriction,LimitRanger,ServiceAccount,DefaultStorageClass,ResourceQuota \\
  --etcd-cafile=/var/lib/kubernetes/ca.pem \\
  --etcd-certfile=/var/lib/kubernetes/kubernetes.pem \\
  --etcd-keyfile=/var/lib/kubernetes/kubernetes-key.pem \\
  --etcd-servers=https://$CONTROLLER0_IP:2379,https://$CONTROLLER1_IP:2379 \\
  --event-ttl=1h \\
  --encryption-provider-config=/var/lib/kubernetes/encryption-config.yaml \\
  --kubelet-certificate-authority=/var/lib/kubernetes/ca.pem \\
  --kubelet-client-certificate=/var/lib/kubernetes/kubernetes.pem \\
  --kubelet-client-key=/var/lib/kubernetes/kubernetes-key.pem \\
  --kubelet-https=true \\
  --runtime-config=api/all=true \\
  --service-account-key-file=/var/lib/kubernetes/service-account.pem \\
  --service-cluster-ip-range=10.32.0.0/24 \\
  --service-node-port-range=30000-32767 \\
  --tls-cert-file=/var/lib/kubernetes/kubernetes.pem \\
  --tls-private-key-file=/var/lib/kubernetes/kubernetes-key.pem \\
  --v=2 \\
  --kubelet-preferred-address-types=InternalIP,InternalDNS,Hostname,ExternalIP,ExternalDNS
Restart=on-failure
RestartSec=5

[Install]
WantedBy=multi-user.target
EOF
Set up controller manager
We need to place the kubeconfig file for the controller manager in the kubernetes folder. And then create a systemd file with the instructions to start the service
cloud_user@ctl01:~$ kube-controller-manager --version
Kubernetes v1.18.6
sudo cp kube-controller-manager.kubeconfig /var/lib/kubernetes/
cat << EOF | sudo tee /etc/systemd/system/kube-controller-manager.service
[Unit]
Description=Kubernetes Controller Manager
Documentation=https://github.com/kubernetes/kubernetes

[Service]
ExecStart=/usr/local/bin/kube-controller-manager \\
  --address=0.0.0.0 \\
  --cluster-cidr=10.200.0.0/16 \\
  --cluster-name=kubernetes \\
  --cluster-signing-cert-file=/var/lib/kubernetes/ca.pem \\
  --cluster-signing-key-file=/var/lib/kubernetes/ca-key.pem \\
  --kubeconfig=/var/lib/kubernetes/kube-controller-manager.kubeconfig \\
  --leader-elect=true \\
  --root-ca-file=/var/lib/kubernetes/ca.pem \\
  --service-account-private-key-file=/var/lib/kubernetes/service-account-key.pem \\
  --service-cluster-ip-range=10.32.0.0/24 \\
  --use-service-account-credentials=true \\
  --v=2
Restart=on-failure
RestartSec=5

[Install]
WantedBy=multi-user.target
EOF
Set up the kubernetes scheduler
The schedulre requires a yaml config file that points to the kubeconfig file.
cloud_user@ctl01:~$ kube-scheduler --version
I0719 00:37:31.273277    8689 registry.go:150] Registering EvenPodsSpread predicate and priority function
I0719 00:37:31.273343    8689 registry.go:150] Registering EvenPodsSpread predicate and priority function
Kubernetes v1.18.6
cloud_user@pzolo2c:~$ sudo mkdir -p /etc/kubernetes/config/
cloud_user@pzolo2c:~$ sudo cp kube-scheduler.kubeconfig /var/lib/kubernetes/
cloud_user@pzolo2c:~$ cat << EOF | sudo tee /etc/kubernetes/config/kube-scheduler.yaml
apiVersion: kubescheduler.config.k8s.io/v1alpha2
kind: KubeSchedulerConfiguration
clientConnection:
  kubeconfig: "/var/lib/kubernetes/kube-scheduler.kubeconfig"
leaderElection:
  leaderElect: true
EOF
cat << EOF | sudo tee /etc/systemd/system/kube-scheduler.service
[Unit]
Description=Kubernetes Scheduler
Documentation=https://github.com/kubernetes/kubernetes

[Service]
ExecStart=/usr/local/bin/kube-scheduler \\
  --config=/etc/kubernetes/config/kube-scheduler.yaml \\
  --v=2
Restart=on-failure
RestartSec=5

[Install]
WantedBy=multi-user.target
EOF
Now that all the required control plane services have been created, we can enabled and start them
sudo systemctl daemon-reload
sudo systemctl enable kube-apiserver kube-controller-manager kube-scheduler
sudo systemctl start kube-apiserver kube-controller-manager kube-scheduler
Setting up the healthz proxy
This step is required ONLY if the load balancer can't monitor services running on https. You can setup a proxy with nginx that will send requests on port 80 to the local instance of the kube-apiserver running on port 6443.
cloud_user@ctl02:~$ sudo apt-get install -y nginx
cloud_user@ctl02:~$ cat > kubernetes.default.svc.cluster.local <<EOF
server {
  listen      80;
  server_name kubernetes.default.svc.cluster.local;

  location /healthz {
     proxy_pass                    https://127.0.0.1:6443/healthz;
     proxy_ssl_trusted_certificate /var/lib/kubernetes/ca.pem;
  }
}
EOF
cloud_user@ctl02:~$ sudo mv kubernetes.default.svc.cluster.local /etc/nginx/sites-available/kubernetes.default.svc.cluster.local
cloud_user@ctl02:~$ sudo ln -s /etc/nginx/sites-available/kubernetes.default.svc.cluster.local /etc/nginx/sites-enabled/
cloud_user@ctl01:~$ sudo systemctl restart nginx
cloud_user@ctl01:~$ sudo systemctl enable nginx
Then confirm that the service is up and running with
cloud_user@linuxacademy:~$ curl http://ctl01/healthz -H "Host: kubernetes.default.svc.cluster.local" ; echo ""
ok
Allow the kube-apiserver to access the kublets on the workers
The kube-apiserver running in the controller nodes needs to be able to make changes on the kublets in the worker nodes. The type of authorization used when accesing a service is defined by the --authorization-mode flag. For example, the kube-apiserver allows Node and RBAC authorization. Node: https://kubernetes.io/docs/reference/access-authn-authz/node/ - allows worker nodes to contact the api RBAC: https://kubernetes.io/docs/reference/access-authn-authz/rbac/
We'll need to create a ClusterRole and assign this role to the Kubernetes user with a ClusterRoleBinding
To interact with the controller api we use kubectl and specify the kubeconfig for admin.
cloud_user@ctl01:~$ cat newRole.yml
apiVersion: rbac.authorization.k8s.io/v1beta1
kind: ClusterRole
metadata:
  annotations:
    rbac.authorization.kubernetes.io/autoupdate: "true"
  labels:
    kubernetes.io/bootstrapping: rbac-defaults
  name: system:kube-apiserver-to-kubelet
rules:
  - apiGroups:
      - ""
    resources:
      - nodes/proxy
      - nodes/stats
      - nodes/log
      - nodes/spec
      - nodes/metrics
    verbs:
      - "*"
cloud_user@ctl01:~$ kubectl apply --kubeconfig admin.kubeconfig -f newRole.yml
clusterrole.rbac.authorization.k8s.io/system:kube-apiserver-to-kubelet created
# verify it was created
cloud_user@ctl01:~$ kubectl --kubeconfig admin.kubeconfig get clusterroles
NAME                                                                   CREATED AT
admin                                                                  2020-07-19T00:20:20Z
cluster-admin                                                          2020-07-19T00:20:20Z
edit                                                                   2020-07-19T00:20:20Z
system:aggregate-to-admin                                              2020-07-19T00:20:20Z
system:aggregate-to-edit                                               2020-07-19T00:20:20Z
system:aggregate-to-view                                               2020-07-19T00:20:20Z
[...]
system:kube-apiserver-to-kubelet                                       2020-07-23T21:59:55Z
[...]
Now we want to create a binding
cloud_user@ctl01:~$ cat binding.yml
apiVersion: rbac.authorization.k8s.io/v1beta1
kind: ClusterRoleBinding
metadata:
  name: system:kube-apiserver
  namespace: ""
roleRef:
  apiGroup: rbac.authorization.k8s.io
  kind: ClusterRole
  name: system:kube-apiserver-to-kubelet
subjects:
  - apiGroup: rbac.authorization.k8s.io
    kind: User
    name: kubernetest
cloud_user@ctl01:~$ kubectl apply --kubeconfig admin.kubeconfig -f binding.yml
clusterrolebinding.rbac.authorization.k8s.io/system:kube-apiserver created
# verify it was created
cloud_user@ctl01:~$ kubectl --kubeconfig admin.kubeconfig get clusterrolebinding
NAME                                                   ROLE                                                               AGE
cluster-admin                                          ClusterRole/cluster-admin                                          4d21h
system:basic-user                                      ClusterRole/system:basic-user                                      4d21h
system:controller:attachdetach-controller              ClusterRole/system:controller:attachdetach-controller              4d21h
[...]
system:kube-apiserver                                  ClusterRole/system:kube-apiserver-to-kubelet                       44s
KTHW - The workers
July 26, 2020 - Reading time: 7 minutes
- The worker nodes
The nodes are responsible for the actual work of running container applications managed by kubernetes. Components:
- Kublet: agent running on the node. Provides the API to access the node.
- Kube-proxy: manages iptable rules to provide virtual network access to pods.
- container runtime: download images and run containers (ex. docker, containerd).
OS dependencies
-
Socat: Multipurpose relay (SOcket CAT) Socat is a command line based utility that establishes two bidirectional byte streams and transfers data between them. It enables support to the kubectl port-forward command.
-
Conntrack: command line interface for netfilter connection tracking Using conntrack , you can dump a list of all (or a filtered selection of) currently tracked connections, delete connections from the state table, and even add new ones.
-
Ipset: administration tool for IP sets A netfilter projectm some of the uses are: store multiple IP addresses or port numbers and match against the collection by iptables at one swoop; dynamically update iptables rules against IP addresses or ports without performance penalty; express complex IP address and ports based rulesets with one single iptables rule and benefit from the speed of IP sets
Worker binaries
-
cri-tools Introduced in Kubernetes 1.5, the Container Runtime Interface (CRI) is a plugin interface which enables kubelet to use a wide variety of container runtimes, without the need to recompile. https://github.com/kubernetes-sigs/cri-tools
-
runc runc is a CLI tool for spawning and running containers according to the OCI specification. Open Container Initiative is an open governance structure for the express purpose of creating open industry standards around container formats and runtimes. Currently contains two specifications: the Runtime Specification (runtime-spec) and the Image Specification (image-spec). The Runtime Specification outlines how to run a “filesystem bundle” that is unpacked on disk. https://github.com/opencontainers/runc
-
cni The Container Network Interface project, consists of a specification and libraries for writing plugins to configure network interfaces in Linux containers, along with a number of supported plugins. We'll use the cni-plugins project. This is a Cloud Native Computing Foundation (CNCF) project currently on incubation phase. (known incubation projects: etcd, cni) (known graduated projects from CNCF: kubernetes, prometheus, coreDNS, containerd, fluentd) https://github.com/containernetworking
-
containerd An industry-standard container runtime with an emphasis on simplicity, robustness and portability Graduated on Cloud Native Computing Foundation on 2019.
-
kubectl
-
kube-proxy
-
kublet
Install the binaries and OS dependencies
sudo -y install socat conntrack ipset
wget -q --show-progress --https-only --timestamping \
  https://github.com/kubernetes-sigs/cri-tools/releases/download/v1.18.0/crictl-v1.18.0-linux-amd64.tar.gz \
  https://github.com/opencontainers/runc/releases/download/v1.0.0-rc91/runc.amd64 \
  https://github.com/containernetworking/plugins/releases/download/v0.8.6/cni-plugins-linux-amd64-v0.8.6.tgz \
  https://github.com/containerd/containerd/releases/download/v1.3.6/containerd-1.3.6-linux-amd64.tar.gz \
  https://storage.googleapis.com/kubernetes-release/release/v1.18.6/bin/linux/amd64/kubectl \
  https://storage.googleapis.com/kubernetes-release/release/v1.18.6/bin/linux/amd64/kube-proxy \
  https://storage.googleapis.com/kubernetes-release/release/v1.18.6/bin/linux/amd64/kubelet
sudo mkdir -p \
  /etc/cni/net.d \
  /opt/cni/bin \
  /var/lib/kubelet \
  /var/lib/kube-proxy \
  /var/lib/kubernetes \
  /var/run/kubernetes
mkdir containerd
tar -xvf crictl-v1.18.0-linux-amd64.tar.gz
tar -xvf containerd-1.3.6-linux-amd64.tar.gz -C containerd
sudo tar -xvf cni-plugins-linux-amd64-v0.8.6.tgz -C /opt/cni/bin/
sudo mv runc.amd64 runc
chmod +x crictl kubectl kube-proxy kubelet runc
sudo mv crictl kubectl kube-proxy kubelet runc /usr/local/bin/
sudo mv containerd/bin/* /bin/
Configure containerd
sudo mkdir -p /etc/containerd/
cat << EOF | sudo tee /etc/containerd/config.toml
[plugins]
  [plugins.cri.containerd]
    snapshotter = "overlayfs"
    [plugins.cri.containerd.default_runtime]
      runtime_type = "io.containerd.runtime.v1.linux"
      runtime_engine = "/usr/local/bin/runc"
      runtime_root = ""
EOF
cat <<EOF | sudo tee /etc/systemd/system/containerd.service
[Unit]
Description=containerd container runtime
Documentation=https://containerd.io
After=network.target

[Service]
ExecStartPre=/sbin/modprobe overlay
ExecStart=/bin/containerd
Restart=always
RestartSec=5
Delegate=yes
KillMode=process
OOMScoreAdjust=-999
LimitNOFILE=1048576
LimitNPROC=infinity
LimitCORE=infinity

[Install]
WantedBy=multi-user.target
EOF
Configure the kubelet
Starting on K8s v1.8 the Kubelet won't work on a machine with swap enabled. To permanently disable swap, we need to comment out the line on fstab that mounts the swap partition:
cloud_user@wrk02:~$ grep swap /etc/fstab
#/swapfile swap swap defaults 0 0
To verify if swap is currently turned on:
cloud_user@wrk01:~$ sudo swapon --show
NAME      TYPE  SIZE USED PRIO
/swapfile file 1000M   0B   -1
#
# Turn off with swapoff:
#
cloud_user@wrk01:~$ sudo swapoff -a
cloud_user@wrk01:~$
HOSTNAME=$(hostname)
sudo mv ${HOSTNAME}-key.pem ${HOSTNAME}.pem /var/lib/kubelet/
sudo mv ${HOSTNAME}.kubeconfig /var/lib/kubelet/kubeconfig
sudo mv ca.pem /var/lib/kubernetes/
cat << EOF | sudo tee /var/lib/kubelet/kubelet-config.yaml
kind: KubeletConfiguration
apiVersion: kubelet.config.k8s.io/v1beta1
authentication:
anonymous:
enabled: false
webhook:
enabled: true
x509:
clientCAFile: "/var/lib/kubernetes/ca.pem"
authorization:
mode: Webhook
clusterDomain: "cluster.local"
clusterDNS:
- "10.32.0.10"
runtimeRequestTimeout: "15m"
tlsCertFile: "/var/lib/kubelet/${HOSTNAME}.pem"
tlsPrivateKeyFile: "/var/lib/kubelet/${HOSTNAME}-key.pem"
EOF
cat << EOF | sudo tee /etc/systemd/system/kubelet.service
[Unit]
Description=Kubernetes Kubelet
Documentation=https://github.com/kubernetes/kubernetes
After=containerd.service
Requires=containerd.service
[Service]
ExecStart=/usr/local/bin/kubelet \\
--config=/var/lib/kubelet/kubelet-config.yaml \\
--container-runtime=remote \\
--container-runtime-endpoint=unix:///var/run/containerd/containerd.sock \\
--image-pull-progress-deadline=2m \\
--kubeconfig=/var/lib/kubelet/kubeconfig \\
--network-plugin=cni \\
--register-node=true \\
--v=2 \\
--hostname-override=${HOSTNAME} \\
Restart=on-failure
RestartSec=5
[Install]
WantedBy=multi-user.target
EOFconfigure the kubernetes proxy
sudo mv kube-proxy.kubeconfig /var/lib/kube-proxy/kubeconfig
cat << EOF | sudo tee /var/lib/kube-proxy/kube-proxy-config.yaml
kind: KubeProxyConfiguration
apiVersion: kubeproxy.config.k8s.io/v1alpha1
clientConnection:
  kubeconfig: "/var/lib/kube-proxy/kubeconfig"
mode: "iptables"
clusterCIDR: "10.200.0.0/16"
EOF
cat << EOF | sudo tee /etc/systemd/system/kube-proxy.service
[Unit]
Description=Kubernetes Kube Proxy
Documentation=https://github.com/kubernetes/kubernetes

[Service]
ExecStart=/usr/local/bin/kube-proxy \\
  --config=/var/lib/kube-proxy/kube-proxy-config.yaml
Restart=on-failure
RestartSec=5

[Install]
WantedBy=multi-user.target
EOF
Verify that the workers have registered with the controllers
We can check this from one of the controllers:
cloud_user@ctl01:~$ kubectl get nodes --kubeconfig admin.kubeconfig
NAME             STATUS     ROLES    AGE     VERSION
wrk01.kube.com   NotReady   <none>   10m     v1.18.6
wrk02.kube.com   NotReady   <none>   3m38s   v1.18.6
KTHW - Load balance requests to controller nodes
July 26, 2020 - Reading time: ~1 minute
The loadbalancer will be use to access both controllers from a single point. In this example we'll use nginx with a stream load balancer for port 443 and 6443
sudo apt-get install -y nginx
sudo systemctl enable nginx
sudo mkdir -p /etc/nginx/tcpconf.d
sudo vi /etc/nginx/nginx.conf
## Add the line:
## include /etc/nginx/tcpconf.d/*;
## create the kubernetes config:
cloud_user@kubelb:~$ cat /etc/nginx/tcpconf.d/kubernetes.conf
stream {
    upstream kubernetes {
        server 172.31.19.77:6443;
        server 172.31.24.213:6443;
    }

    server {
        listen 6443;
        listen 443;
        proxy_pass kubernetes;
    }
}
sudo nginx -s reload
KTHW - Kubernetes and network, the basic
July 30, 2020 - Reading time: 5 minutes
The networking model help us deal with the following problems:
- Communication between containers.
- Reaching containers on different working nodes.
- How to reach services
- What IP address / port will be assigned to a container
The Kubernetes model was designed to overcome some of the limitations of the Docker model. With Docker, each hosts creates a virtual network bridge that allows containers in the same host to communicate to each other, and to initiate outbound connections. For containers on different hosts, the administrator needs to creat a proxy on the host to expose a port to the container.
All this proxying of services can become very complicated when dealing with muyltiple containers.
The Kubernetes solution is to create one virtual network for the whole cluster.
- Each pod has a unique IP address
- Each service has an unique IP address (on a different range than pods)
Cluster CIDR
IP range used to assign IP addresses to pods in the cluster.
The kube-proxy service running on the worker nodes, specifies the clusterCIDR: "10.200.0.0/16".
The kube-controller-manager also includes the --cluster-cidr=10.200.0.0/16 flag.
Each pod gets an IP address assigned from the cluster CIDR subnet. All the containers inside a pod will share this IP address.
This means that containers inside the same pod can communicate via localhost.
The Container Network Interface will reserve a subnet for each worker node, and assign the new IP address to pods.
The problem with this model, is that if a pod gets restarted, the CNI assigns a new IP address. In order to keep a static IP address for a service (group of containers), and to allow access from outside the cluster (for example via NodePort) we use Service Cluster.
Service cluster
IP range used for services in the cluster. This range MUST NOT overlap with the cluster CIDR range.
One of the parameters we set when we created the systemd unit service for kube-apiserver was the --service-cluster-ip-range=10.32.0.0/24 and --service-node-port-range=30000-32767
The nodeport range is used when providing access to services via kube-proxy in nodeport mode. In this mode, a port is open on the worker node and the traffic is redirected from there to the service (using iptables or ipvs)
The kube-controller-manager has a --service-cluster-ip-range=10.32.0.0/24 flag
One of the SAN on the kubernetes.pem certificate was IP Address:10.32.0.1
Pod CIDR
The specific IP range for pods on one worker node. This range shouldn't overlap between worker nodes. For example, 10.200.1.0/24 and 10.200.2.0/24 Some network plugins will handle this automatically.
Types of networking and requirements
- Communication between containers in a pod (handled by the container runtime) - Docker uses a virtual bridge named docker0. Each container creates a Virtual Ethernet Device and it's attached to the bridge. Containers inside a pod can also communicate via localhost, or intra-process communication.
- Communication between pods (across nodes) - Known as East-west traffic - Implemented by the CNI plugin
- Communication between pods happens without NAT
- External exposure of services to external clients - Kown as North-south traffic
- Service discovery and load balancing
- Segmenting networks for pod security
CNI plugins
Used to implement pod-to-pod communication (Calico, Weave, Flannel) Currently there are 3 types of networking
- L2 (switching)
- L3 (routing)
- Overlay (tunneling)
L2
Easiest type of communication. All the pods and nodes are in the same L2 domain Pod-to-pod communication happens through ARP. Bridge plugin example:
{
    "name":"kubenet",
    "type":"bridge",
    "bridge":"kube-bridge",
    "isDefatultGateway": true,
    "ipam" : {
                "type": "host-local",
                "subnet": "10.1.0.0./16"
            }
}
L2 is not scalable.
L3
Flannel is an example of a L3 plugin.
Overlay configuration
It's a Software Defined Network. Using tunnels.
Common encapsulation mechanisms such as VXLAN, GRE are availalbe.
Services
Used to expose functionality externally.
The service refers to a set of pods which is based on labels.
Services get a publicly accesible IP address.
KTHW - Create a kubeconfig file for remote access
August 2, 2020 - Reading time: 2 minutes
By default kubectl stores the user's configuration under ~/.kube/config.
To create the file, we just need to run kubectl with the config option and set the name of the cluster:
cloud_user@client:~$ kubectl config set-cluster kubernetes-the-hard-way
Cluster "kubernetes-the-hard-way" set.
cloud_user@client:~$ cat ~/.kube/config
apiVersion: v1
clusters:
- cluster:
    server: ""
  name: kubernetes-the-hard-way
contexts: null
current-context: ""
kind: Config
preferences: {}
users: null
We can then add the rest of the settings, like the IP address of the API server, and the certificates signed by the CA.
cloud_user@client:~$ kubectl config set clusters.kubernetes-the-hard-way.server https://172.31.23.61:6443
cloud_user@client:~$ kubectl config set-cluster kubernetes-the-hard-way --embed-certs=true --certificate-authority kthw/ca.pem
cloud_user@client:~$ kubectl config set-credentials admin --client-certificate=kthw/admin.pem  --client-key=kthw/admin-key.pem
Then create the user and the context.
A context is a group of access parameters. Each context contains a Kubernetes cluster, a user, and a namespace.
The current context is the cluster that is currently the default for kubectl
cloud_user@client:~$ kubectl config set-credentials admin --client-certificate=kthw/admin.pem  --client-key=kthw/admin-key.pem
cloud_user@client:~$ kubectl config set-context kubernetes-the-hard-way --cluster=kubernetes-the-hard-way --user=admin
cloud_user@client:~$ kubectl config view
apiVersion: v1
clusters:
- cluster:
    certificate-authority-data: DATA+OMITTED
    server: https://172.31.23.61:6443
  name: kubernetes-the-hard-way
contexts:
- context:
    cluster: kubernetes-the-hard-way
    user: admin
  name: kubernetes-the-hard-way
current-context: ""
kind: Config
preferences: {}
users:
- name: admin
  user:
    client-certificate: /home/cloud_user/kthw/admin.pem
    client-key: /home/cloud_user/kthw/admin-key.pem
The current-context is still empty. So the last thing we need to do is specify that we want to use the newly created context.
cloud_user@client:~$ kubectl config use-context kubernetes-the-hard-wayNow we should be able to get details about our cluster
cloud_user@client:~$ kubectl get nodes
NAME             STATUS     ROLES    AGE    VERSION
wrk01.kube.com   NotReady   <none>   4d5h   v1.18.6
wrk02.kube.com   NotReady   <none>   4d5h   v1.18.6
KTHW - Set up networking with Weave Net.
August 2, 2020 - Reading time: 10 minutes
We now need to set up a CNI plugin that will allow us to have east-to-west traffic between pods.
The worker nodes need to allow IP forwarding
sudo sysctl net.ipv4.conf.all.forwarding=1
echo "net.ipv4.conf.all.forwarding=1" | sudo tee -a /etc/sysctl.conf
We'll download an auto-generated configuration from Weave for our specific version of Kubernetes, and for a a Cluster CIDR of 10.200.0.0/16.
cloud_user@ctl01:~$ curl "https://cloud.weave.works/k8s/net?k8s-version=$(kubectl version | base64 | tr -d '\n')&env.IPALLOC_RANGE=10.200.0.0/16" -Lo weave.conf
cloud_user@ctl01:~$ grep kind weave.conf
kind: List
    kind: ServiceAccount
    kind: ClusterRole
    kind: ClusterRoleBinding
      kind: ClusterRole
      - kind: ServiceAccount
    kind: Role
    kind: RoleBinding
      kind: Role
      - kind: ServiceAccount
    kind: DaemonSet
The file is of kind: List that creates a new role for Weave. The role is added to the kube-ssytem namespace:
cloud_user@ctl01:~$ kubectl  get  ns
NAME              STATUS   AGE
default           Active   14d
kube-node-lease   Active   14d
kube-public       Active   14d
kube-system       Active   14d
The config file then launches a DaemonSet - A DaemonSet ensures that all (or some) Nodes run a copy of a Pod. As nodes are added to the cluster, Pods are added to them. As nodes are removed from the cluster, those Pods are garbage collected. Deleting a DaemonSet will clean up the Pods it created.
The DaemonSet will download and install two containers in both worker nodes:
    kind: DaemonSet
...
      labels:
        name: weave-net
      namespace: kube-system
    spec:
...
          containers:
            - name: weave
              command:
                - /home/weave/launch.sh
...
                - name: IPALLOC_RANGE
                  value: 10.200.0.0/16
              image: 'docker.io/weaveworks/weave-kube:2.6.5'

...
              image: 'docker.io/weaveworks/weave-npc:2.6.5'
              resources:
                requests:
                  cpu: 10m
To apply the configuration:
cloud_user@ctl01:~$ kubectl apply -f weave.conf
serviceaccount/weave-net created
clusterrole.rbac.authorization.k8s.io/weave-net created
clusterrolebinding.rbac.authorization.k8s.io/weave-net created
role.rbac.authorization.k8s.io/weave-net created
rolebinding.rbac.authorization.k8s.io/weave-net created
daemonset.apps/weave-net created
Verify that the new pods were created with:
cloud_user@ctl01:~$ kubectl get pods -n kube-system
NAME              READY   STATUS    RESTARTS   AGE
weave-net-979r7   2/2     Running   0          6m14s
weave-net-xfnbz   2/2     Running   0          6m15s
Each one of the pods was created in a different worker node. And it has two containers. For example, on wrk01:
cloud_user@wrk01:~$ sudo ls -l /var/log/pods/kube-system_weave-net-xfnbz_9*/
total 8
drwxr-xr-x 2 root root 4096 Aug  2 20:44 weave
drwxr-xr-x 2 root root 4096 Aug  2 20:44 weave-npc
Now that the pods were created, the new network interfaces were added to the workers:
cloud_user@wrk02:~$ ip -h link
1: lo: <LOOPBACK,UP,LOWER_UP> mtu 65536 qdisc noqueue state UNKNOWN mode DEFAULT group default qlen 1
    link/loopback 00:00:00:00:00:00 brd 00:00:00:00:00:00
2: eth0: <BROADCAST,MULTICAST,UP,LOWER_UP> mtu 9001 qdisc mq state UP mode DEFAULT group default qlen 1000
    link/ether 0a:fa:ab:9d:5b:14 brd ff:ff:ff:ff:ff:ff
3: datapath: <BROADCAST,MULTICAST,UP,LOWER_UP> mtu 1376 qdisc noqueue state UNKNOWN mode DEFAULT group default qlen 1000
    link/ether f2:80:55:b3:75:5f brd ff:ff:ff:ff:ff:ff
5: weave: <BROADCAST,MULTICAST,UP,LOWER_UP> mtu 1376 qdisc noqueue state UP mode DEFAULT group default qlen 1000
    link/ether 26:ca:30:44:3b:74 brd ff:ff:ff:ff:ff:ff
6: dummy0: <BROADCAST,NOARP> mtu 1500 qdisc noop state DOWN mode DEFAULT group default qlen 1000
    link/ether 92:35:4a:ab:ba:38 brd ff:ff:ff:ff:ff:ff
8: vethwe-datapath@vethwe-bridge: <BROADCAST,MULTICAST,UP,LOWER_UP> mtu 1376 qdisc noqueue master datapath state UP mode DEFAULT group default
    link/ether 9e:ea:ca:e5:23:fa brd ff:ff:ff:ff:ff:ff
9: vethwe-bridge@vethwe-datapath: <BROADCAST,MULTICAST,UP,LOWER_UP> mtu 1376 qdisc noqueue master weave state UP mode DEFAULT group default
    link/ether 82:cf:0d:a5:8b:aa brd ff:ff:ff:ff:ff:ff
10: vxlan-6784: <BROADCAST,MULTICAST,UP,LOWER_UP> mtu 65485 qdisc noqueue master datapath state UNKNOWN mode DEFAULT group default qlen 1000
    link/ether 66:6f:b4:6d:b9:d1 brd ff:ff:ff:ff:ff:ff
cloud_user@wrk02:~$ ip -h -4 addr
1: lo: <LOOPBACK,UP,LOWER_UP> mtu 65536 qdisc noqueue state UNKNOWN group default qlen 1
    inet 127.0.0.1/8 scope host lo
       valid_lft forever preferred_lft forever
2: eth0: <BROADCAST,MULTICAST,UP,LOWER_UP> mtu 9001 qdisc mq state UP group default qlen 1000
    inet 172.31.26.138/20 brd 172.31.31.255 scope global eth0
       valid_lft forever preferred_lft forever
5: weave: <BROADCAST,MULTICAST,UP,LOWER_UP> mtu 1376 qdisc noqueue state UP group default qlen 1000
    inet 10.200.0.1/16 brd 10.200.255.255 scope global weave
valid_lft forever preferred_lft forever- wrk02 has 10.200.0.1/16
- wrk01 has 10.200.192.0/16
Creating our first deployment
We can now created a Deployment of two nginx pods, to confirm that a pod IP address is automatically assigned to each pod:
cloud_user@ctl01:~$ cat nginx.conf
apiVersion: apps/v1
kind: Deployment
metadata:
  name: nginx
spec:
  selector:
    matchLabels:
      run: nginx
  replicas: 2
  template:
    metadata:
      labels:
        run: nginx
    spec:
      containers:
      - name: my-nginx
        image: nginx
        ports:
        - containerPort: 80

cloud_user@ctl01:~$ kubectl apply -f nginx.conf
deployment.apps/nginx created

cloud_user@ctl01:~$ kubectl get pods -o wide
NAME                     READY   STATUS    RESTARTS   AGE     IP             NODE             NOMINATED NODE   READINESS GATES
nginx-7866ff8b79-ktvrs   1/1     Running   0          6m57s   10.200.0.2     wrk02.kube.com   <none>           <none>
nginx-7866ff8b79-v2n4l   1/1     Running   0          6m57s   10.200.192.1   wrk01.kube.com   <none>           <none>
The Weave logs on the worker nodes shows that two new cluster IP were associated to the pods
2020-08-02T21:06:44.554513018Z stderr F INFO: 2020/08/02 21:06:44.554368 adding entry 10.200.0.2 to weave-k?Z;25^M}|1s7P3|H9i;*;MhG of 064e9bf5-8a47-4c21-8ae9-35557edbdc9a
...
2020-08-02T21:06:45.129688044Z stderr F INFO: 2020/08/02 21:06:45.129574 adding entry 10.200.192.1 to weave-k?Z;25^M}|1s7P3|H9i;*;MhG of a2cb5dee-88a7-474c-9aa4-5bf573dda302
The VXLAN set by Weave allows a client running on wrk01 to reach the nginx running on wrk02. The packets are encapsulated inside UDP, and a header includes the unique VXLAN identifier
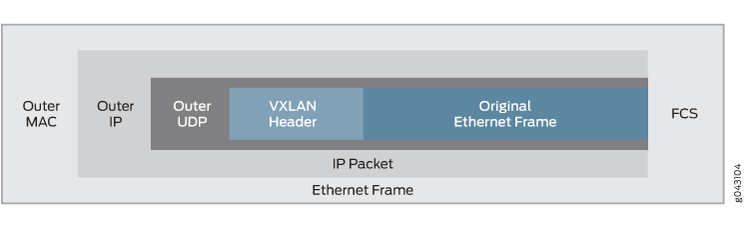
source: https://www.juniper.net/documentation/en_US/junos/topics/topic-map/sdn-vxlan.html
  171  15.191593 172.31.26.138 → 172.31.29.196 UDP 126 58287 → 6784 Len=82
  172  15.191720 172.31.29.196 → 172.31.26.138 UDP 118 44751 → 6784 Len=74
  173  15.191731 172.31.29.196 → 172.31.26.138 UDP 192 44751 → 6784 Len=148
  174  15.191735 10.200.192.0 → 10.200.0.2   TCP 68 37224 → 80 [ACK] Seq=1 Ack=1 Win=26752 Len=0 TSval=298244 TSecr=297810
  175  15.191737 10.200.192.0 → 10.200.0.2   TCP 68 [TCP Dup ACK 174#1] 37224 → 80 [ACK] Seq=1 Ack=1 Win=26752 Len=0 TSval=298244 TSecr=297810
  176  15.191739 10.200.192.0 → 10.200.0.2   HTTP 142 GET / HTTP/1.1
Exposing a service
Now we can expose the nginx deployment as a Kubernetes service
cloud_user@client:~$ kubectl get deployment -o wide
NAME    READY   UP-TO-DATE   AVAILABLE   AGE     CONTAINERS   IMAGES   SELECTOR
nginx   2/2     2            2           6d23h   my-nginx     nginx    run=nginx
Run the expose command:
cloud_user@client:~$ kubectl expose deployment/nginx
service/nginx exposed

cloud_user@client:~$ kubectl get service -o wide
NAME         TYPE        CLUSTER-IP   EXTERNAL-IP   PORT(S)   AGE   SELECTOR
kubernetes   ClusterIP   10.32.0.1    <none>        443/TCP   21d   <none>
nginx        ClusterIP   10.32.0.65   <none>        80/TCP    31s   run=nginx
To verify that we can connect to the service, we'll launch a new pod running busybox (BusyBox combines tiny versions of many common UNIX utilities into a single small executable.) - In this example we'll run a modified version of busybox from radial that includes curl
cloud_user@client:~$ kubectl run busybox --image=radial/busyboxplus:curl --command -- sleep 3600
pod/busybox created
cloud_user@client:~$ kubectl get po -o wide
NAME                     READY   STATUS    RESTARTS   AGE     IP             NODE             NOMINATED NODE   READINESS GATES
busybox                  1/1     Running   0          23s     10.200.0.3     wrk02.kube.com   <none>           <none>
nginx-7866ff8b79-ktvrs   1/1     Running   1          6d23h   10.200.0.2     wrk02.kube.com   <none>           <none>
nginx-7866ff8b79-v2n4l   1/1     Running   1          6d23h   10.200.192.1   wrk01.kube.com   <none>           <none>
The first attempt to run curl on that the pod returns an error:
cloud_user@ctl01:~$  kubectl exec busybox  -- curl 10.32.0.65
error: unable to upgrade connection: Forbidden (user=kubernetes, verb=create, resource=nodes, subresource=proxy)
The problem is that the kublet doesn't allow the apiserver (with user CN=kubernetes) to use the kubelet API. https://github.com/kubernetes/kubernetes/issues/65939#issuecomment-403218465
To fix this we need to create a new clusterrolebinding for the existing clusterrole: system:kubelet-api-admin and the kubernetes user:
cloud_user@ctl01:~$ kubectl create clusterrolebinding apiserver-kubelet-api-admin --clusterrole system:kubelet-api-admin --user kubernetes
clusterrolebinding.rbac.authorization.k8s.io/apiserver-kubelet-api-admin created
cloud_user@ctl01:~$ kubectl get clusterrole | grep kubelet-api-admin
system:kubelet-api-admin                                               2020-07-19T00:20:21Z
cloud_user@ctl01:~$ kubectl get clusterrolebinding | grep  kubelet-api-admin
apiserver-kubelet-api-admin                            ClusterRole/system:kubelet-api-admin                               18m
Then:
cloud_user@ctl01:~$  kubectl exec busybox  -- curl 10.32.0.65 -sI
HTTP/1.1 200 OK
Server: nginx/1.19.1
Date: Sun, 09 Aug 2020 21:18:52 GMT
Content-Type: text/html
Content-Length: 612
Last-Modified: Tue, 07 Jul 2020 15:52:25 GMT
Connection: keep-alive
ETag: "5f049a39-264"
Accept-Ranges: bytes
Clean up objects
We can remove the nginx and busybox pods we created to test the CNI.
cloud_user@client:~$ kubectl delete  pod busybox
pod "busybox" deleted
cloud_user@client:~$ kubectl delete svc nginx
service "nginx" deleted
cloud_user@client:~$ kubectl delete  deployment nginx
deployment.apps "nginx" deleted
KTHW - DNS inside a Pod Network
August 16, 2020 - Reading time: 3 minutes
DNS inside a Pod Network
The DNS service is used by pods to find other pods. The service will also set the DNS settings inside the containers, this is useful to reach other pods inside the cluster.
The original guide I was following to deploy the K8S cluster uses kube-dns, but a newer version of the guide uses coreDNS. Here are the main differences between the two services:
- CoreDNS is a single container per instance, vs kube-dns which uses three.
- Kube-dns uses dnsmasq for caching, which is single threaded C. CoreDNS is multi-threaded Go.
- CoreDNS enables negative caching in the default deployment. Kube-dns does not.
Source: https://coredns.io/2018/11/27/cluster-dns-coredns-vs-kube-dns
Due to the fact that I have low-resource workers, I decided to go with CoreDNS.
cloud_user@client:~$ curl -sLO https://storage.googleapis.com/kubernetes-the-hard-way/coredns-1.7.0.yaml
cloud_user@client:~$ grep kind coredns-1.7.0.yaml
kind: ServiceAccount
kind: ClusterRole
kind: ClusterRoleBinding
  kind: ClusterRole
- kind: ServiceAccount
kind: ConfigMap
kind: Deployment
kind: Service
The yaml file contains a ServiceAccount (used for processes inside a container to contact the apiserver) Then creates a cluster Role/Binding. A ConfigMap is used to pass the coreDNS configuration to the container. Then a deployment is created with two pods and a new service with a clusterIP of 10.32.0.10
cloud_user@client:~$ kubectl create -f coredns-1.7.0.yaml
serviceaccount/coredns created
clusterrole.rbac.authorization.k8s.io/system:coredns created
clusterrolebinding.rbac.authorization.k8s.io/system:coredns created
configmap/coredns created
deployment.apps/coredns created
service/kube-dns created
Once the service is deployed:
cloud_user@client:~$ kubectl get deployment -n kube-system
NAME      READY   UP-TO-DATE   AVAILABLE   AGE
coredns   2/2     2            2           40s
cloud_user@client:~$ kubectl get svc -n kube-system
NAME       TYPE        CLUSTER-IP   EXTERNAL-IP   PORT(S)                  AGE
kube-dns   ClusterIP   10.32.0.10   <none>        53/UDP,53/TCP,9153/TCP   100s
cloud_user@client:~$ kubectl get pods -l k8s-app=kube-dns -n kube-system
NAME                       READY   STATUS    RESTARTS   AGE
coredns-5677dc4cdb-6ssp5   1/1     Running   0          12m
coredns-5677dc4cdb-m5xtm   1/1     Running   0          12m
Now to test the new service, we launch a busybox pod:
cloud_user@client:~$ kubectl run busybox --image=busybox:1.28 --command -- sleep 3600
pod/busybox created
cloud_user@client:~$ kubectl exec -ti  busybox -- cat /etc/resolv.conf
search default.svc.cluster.local svc.cluster.local cluster.local mylabserver.com
nameserver 10.32.0.10
options ndots:5
cloud_user@client:~$ kubectl exec -ti  busybox -- nslookup kubernetes
Server:    10.32.0.10
Address 1: 10.32.0.10 kube-dns.kube-system.svc.cluster.local

Name:      kubernetes
Address 1: 10.32.0.1 kubernetes.default.svc.cluster.local
KTHW | Testing the cluster
August 29, 2020 - Reading time: 5 minutes
Now that all the services are up and running in the worker and controller nodes, we'll ensure that all the basic componets are working.
Testing encryption
We'll use k8s secrets to test encryption https://kubernetes.io/docs/concepts/configuration/secret/
Back when we set up the services in the controller, we created the encryption-config.yaml file, with an AES-CBC symetric key:
cloud_user@ctl01:~$ cat /var/lib/kubernetes/encryption-config.yaml
kind: EncryptionConfig
apiVersion: v1
resources:
  - resources:
      - secrets
    providers:
      - aescbc:
          keys:
            - name: key1
              secret: dj2W+t0wxcF+LdACvX/qw0i6Gq8WSEM2fnH4W/Xpt/A=
      - identity: {}
The Pods can then reference the secret in three ways
- As a file in a volume mounted in a container
- As an env var in a container
- Read by the kubelet when pulling images for the pod
Kubernetes also automatically creates secrets, to store ServiceAccount private keys.
cloud_user@ctl01:~$ kubectl create secret generic kubernetes-the-hard-way --from-literal="mykey=mydata"
secret/kubernetes-the-hard-way created
cloud_user@ctl01:~$ kubectl get secrets
NAME                      TYPE                                  DATA   AGE
default-token-xdb6v       kubernetes.io/service-account-token   3      41d
kubernetes-the-hard-way   Opaque                                1      31s
#
# Read the secret
#
cloud_user@ctl01:~$ kubectl get secret kubernetes-the-hard-way -o yaml | head -n4
apiVersion: v1
data:
  mykey: bXlkYXRh
kind: Secret
cloud_user@ctl01:~$ echo "bXlkYXRh" | base64 -d
mydata
We can also confirm that the secret is encrypted in etcd by reading the value of the document
cloud_user@ctl01:~$ sudo ETCDCTL_API=3 etcdctl get   --endpoints=https://127.0.0.1:2379   --cacert=/etc/etcd/ca.pem   --cert=/etc/etcd/kubernetes.pem   --key=/etc/etcd/kubernetes-key.pem  /registry/secrets/default/kubernetes-the-hard-way | xxd -c 32
00000000: 2f72 6567 6973 7472 792f 7365 6372 6574 732f 6465 6661 756c 742f 6b75 6265 726e  /registry/secrets/default/kubern
00000020: 6574 6573 2d74 6865 2d68 6172 642d 7761 790a 6b38 733a 656e 633a 6165 7363 6263  etes-the-hard-way.k8s:enc:aescbc
00000040: 3a76 313a 6b65 7931 3a54 7fb0 b327 4932 1e75 0eb9 2f99 67d0 987a c03b 76e1 e055  :v1:key1:T...'I2.u../.g..z.;v..U
00000060: 3922 8584 b639 13a5 5820 1e5e 9012 7aab eac0 47d4 ae1c 0432 241a d8c8 e2c1 eeb7  9"...9..X .^..z...G....2$.......
00000080: efbb ade7 2895 121c 4ca6 87ea 7fc2 1168 7195 1c34 109d 84c3 4c8d b396 24ec a7c0  ....(...L......hq..4....L...$...
000000a0: 1879 ba54 ae6f a081 d6af 303f 7564 5b81 30d9 0a2d 1910 1568 840b db96 d62e f5e5  .y.T.o....0?ud[.0..-...h........
000000c0: 1549 5ef9 de90 d894 7527 7278 6370 8c2a 70c2 558b 9b52 cfa8 e169 9698 cd42 272b  .I^.....u'rxcp.*p.U..R...i...B'+
000000e0: 40d7 3ea6 6b61 50f5 27e1 956e aca0 8eae 7e9f b116 bddc 86b7 4d8a 8078 6c9c 9b8d  @.>.kaP.'..n....~.......M..xl...
00000100: 97aa 5070 f455 9430 3a9e d589 2094 fbf6 02ea 8233 c320 8a17 40a5 cf61 dcf2 de55  ..Pp.U.0:... ......3. ..@..a...U
00000120: 4423 cfcc 7f2f e1cf 2e2a 86f6 1388 a388 18b5 70c5 562f ad17 166b 0da0 babd 61d5  D#.../...*........p.V/...k....a.
00000140: 8760 4968 7893 74ab 530a                                                         .`Ihx.t.S.
Testing deployments
Let's simply the run command to create and run a particular image in a pod.
cloud_user@ctl01:~$ kubectl run nginx --image=nginx
pod/nginx created
cloud_user@ctl01:~$ kubectl get pods -l run=nginx -o wide
NAME    READY   STATUS    RESTARTS   AGE   IP             NODE             NOMINATED NODE   READINESS GATES
nginx   1/1     Running   0          14s   10.200.192.2   wrk01.kube.com   <none>           <none>
Testing port-forwarding
kubectl port-forward allows using resource name, such as a pod name, to select a matching pod to port forward to.
cloud_user@ctl01:~$ kubectl port-forward  nginx 8081:80
Forwarding from 127.0.0.1:8081 -> 80
Forwarding from [::1]:8081 -> 80

# from a different bash
cloud_user@ctl01:~$ netstat -tupan | grep 8081
(Not all processes could be identified, non-owned process info
 will not be shown, you would have to be root to see it all.)
tcp        0      0 127.0.0.1:8081          0.0.0.0:*               LISTEN      2584/kubectl
tcp6       0      0 ::1:8081                :::*                    LISTEN      2584/kubectl

cloud_user@ctl01:~$ curl localhost:8081
<!DOCTYPE html>
<html>
[...]
A pcap on the worker shows that the controller sends the request to the kubelet in the worker (listening on port 10250)
root@wrk01:/home/cloud_user# netstat -tupan | grep 10250
tcp6       0      0 :::10250                :::*                    LISTEN      607/kubelet
tcp6       0      0 172.31.29.196:10250     172.31.19.77:51844      ESTABLISHED 607/kubelet

root@wrk01:/home/cloud_user# tcpdump -nnr /var/tmp/test -s0 -A port 48418 or host 172.31.19.77
...
10:40:59.139112 IP 172.31.19.77.51844 > 172.31.29.196.10250: Flags [P.], seq 244:352, ack 159, win 267, options [nop,nop,TS val 1714706 ecr 1714323], length 108
E....p@.@......M......(
.......{...........
..*...(.....g.6G.(..0G.qE.1.h(J.]Y..OJ.`.yT.z$xJ..|^.p....M.P...@..V...<;...    .wc...w.........$......K.#.....2......&
10:40:59.139801 IP 127.0.0.1.48418 > 127.0.0.1.41343: Flags [P.], seq 112:198, ack 49, win 350, options [nop,nop,TS val 1714323 ecr 1714323], length 86
E.....@.@............".......&3....^.~.....
..(...(........NGET / HTTP/1.1
...